Often an afternoon on a lake or a day spent going down river isn’t enough waterborne activity to quench your thirst for paddling. Maybe that lake is too big for a one day adventure or perhaps you want to explore another stretch of the river? You don’t have to leave, generally. Extend your trip and camp from your kayak.

Camping out of a kayak is essentially like backpacking out of a boat whereas camping out of a canoe is a kin to pulling up to the KOA and putting up the pop-up. Canoeists heading out for several days, have a much bigger platform to work with and can afford to pack coolers; bigger tents; and bulkier items. Kayakers looking to do a multi-day mission have a lot less space for stowage, so items must be small and ideally serve more than one purpose.
No matter what you paddle, there are a number of items you’ll need to have: Rain gear; safety equipment; clothing; first-aid supplies; a water filter; dry bags; and some sort of mosquito netting to keep the bugs away from you at night being among the essentials. However when it comes to shelter; food; cooking equipment; and some comfort items, kayakers need to make well thought out choices if they want to travel in style.
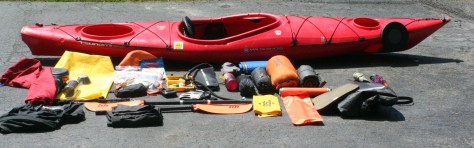
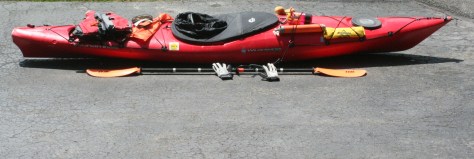
Choosing the right kayak for the job is a big deal. Most solo recreational kayaks are under 12 feet long. A short rec boat can be outfitted for a three day trip, but it takes some skill. Having a light touring kayak 12-13 feet in length or an even longer touring boat is generally the way to go. Most boats this length have sealed bulkheads fore and aft as well as behind-the-seat storage and a good deal of deck space. In most cases, all of this space will be used.
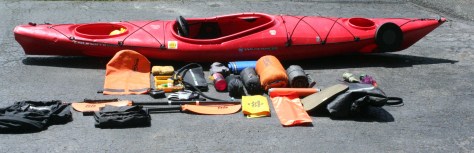
Eliminating bulk is the key to getting all of the stuff you’ll need in (or on) your kayak. Start first by making good food choices. Freeze-dried or dehydrated backpacking meals are a fine thing to eat. They are easy to prepare, especially if all that it takes to cook is some boiling water added to the bag the meal comes in. Foods that need cooking, such as Ramen noodles or rice also are decent options. You’ll just need a stove that has a simmer setting. When possible, discard any packaging before you head out. It’s less you’ll have to bring out and might afford you some extra space. You could skip the gas stove all together and go with a fire provided there are no open fire restrictions where you will be travelling. One problem with using fire is finding enough small fuel to get a fire going. In designated campsites, a lot of times, it’s picked over. Rainy weather too can hamper the quality of kindling and tinder making it difficult to produce flamage.
A white gas or isobutane backpacking stove is a good, compact cooking choice but smaller stoves that run on denatured alcohol or on kindling wood are even lighter and more compact. A small pot, 2 quarts or under, is also something you’ll need. A collapsible water bag is another item to consider along with 1-2 wide mouth quart water bottles. A water filter kept handy can allow you to refill your drinking water while on the go and you can pump a full water bladder for cooking and drinking once at camp.
Shelter is another bulky necessity. Chances are since you’ll be camping near the water, evening insects will want to hassle you. A small two person tent is usually nothing more than a glorified screen house with a rain fly. If split up between two kayaks it works well and doesn’t take up much more space. A rectangular nylon rain fly can also be strung between two trees and mosquito netting can be hung up under it for some protection from the bugs. It’s less bulky than a tent but not the easiest thing to set up. A one person bivy sack is another good choice but most are made of Gore-Tex and can still be rather warm on a summer night. If weather permits, lighten up your sleeping gear as well. Choose a sleep sack intended for hostel use or a lighter fleece sleeping bag. Pack these well and keep they dry. A closed cell foam pad can be rolled and strapped to the deck.

When it comes to bulk, clothing takes up an insane amount of space. The less you can take, the better. One set of clothes to wear while paddling and another set for lounging around camp after dinner is all you need in the summer. If you normally paddle all day wearing just a swim suit, then that’s all you need for the daytime. If you need more sun and wind protection, then wear a lightweight synthetic shirt. At night generally lightweight workout pants and long sleeve shirt is all that’s needed, mostly for protection against insects. However, watch the weather before you go and know the area’s typical temperatures. Fleece pants and a sweatshirt might be a night time necessity. Towels also take up a lot of space. Invest in a thin, superabsorbent, quick-drying towel and leave the big beach towel at home. Avoid the cotton at all costs. Once wet it becomes heavy and loses all its insulation. In humid weather, wet cotton will take forever to dry out too.
Items you hope to not need while on the river should get stowed in the bulkheads or lashed behind you. Things such as water bottles, the water filter, safety equipment, maps, lunch and snacks, and clothes needed for sun and rain protection should be packed or lashed somewhere that’s easy to access.
While you can paddle alone, going in a group allows for a lot of items to be split up among everyone. It’s also adds for some extra safety and camaraderie. Consult some kayaking and backpacking websites and printed literature for more tips and skill building information. There are many sources to supplement this little introduction article, which is intended to inspire more than instruct. Have fun and paddle on!
